How to run Truffle tests in Gitlab CI
Test your smart contracts using a test network in a Gitlab pipeline
If you are building a blockchain-based application (dApp) using continuous integration, you'll want to run tests for your smart contracts in the CI pipeline. In this tutorial, we will use the Truffle Suite for testing on the Ropsten test network (or any other test network like Kovan or Rinkeby), and run those tests with the Gitlab CI. Let's learn how to run Truffle tests in Gitlab CI step by step!
Requirements
First, install Truffle:
npm install -g truffle
Then, to deploy the smart contracts on the Ropsten network, we'll need the truffle-hdwallet-provider package:
npm install @truffle/hdwallet-provider
You can use your own project and smart contracts for this tutorial. If you didn't make anything yet and are just getting started, you can generate a sample dApp (to customize later) with this command:
truffle unbox metacoin
As a final npm package, we'll need dotenv to store our private key:
npm install dotenv
Get an RPC provider with Infura
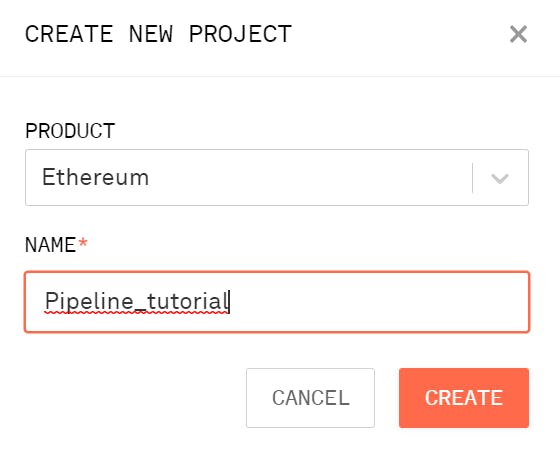
To interact with the Ropsten network with truffle-hdwallet-provider, we'll need an RPC endpoint. To get it, go to Infura and sign-up/login. Then, create a new project:

Name it anything you want and select Ethereum in the PRODUCT dropdown:

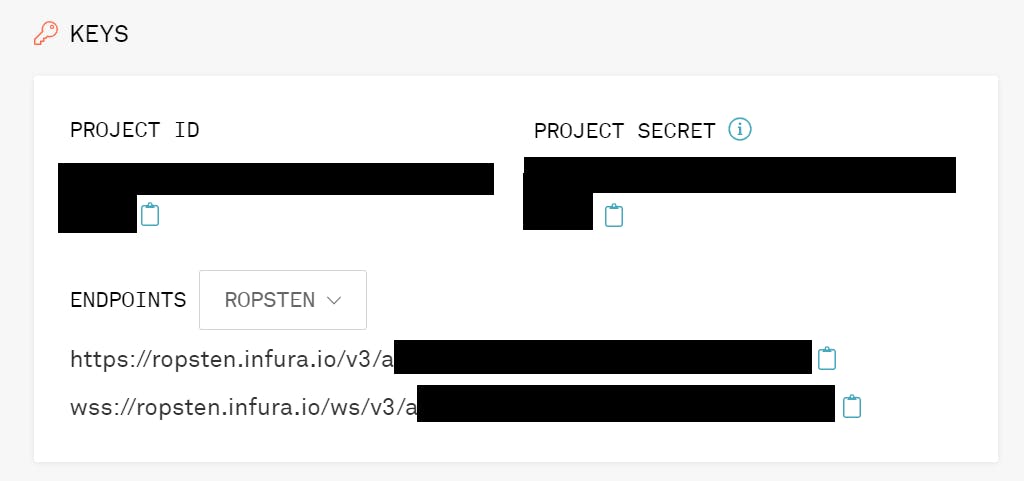
Once created, go to your project settings. In the Keys section, select ROPSTEN in the endpoints dropdown. The RPC endpoint you'll need is the https url:

The truffle-config.js file
require('dotenv').config()

const HDWalletProvider = require("@truffle/hdwallet-provider")

const mnemonic = process.env.MNEMONIC
const rpc_url = 'https://ropsten.infura.io/v3/...'

module.exports = {
  networks: {
    development: {
     host: "127.0.0.1",     // Localhost
     port: 7545,            // Standard Ethereum port
     network_id: "*",       // Any network
    },
    ropsten: {
      provider: () => {
        return new HDWalletProvider(mnemonic, rpc_url);
      },
      network_id: '3',
    }
  },

  compilers: {
    solc: {
      version: "^0.8.0"
    }
  }
};
Before you mindlessly copy-paste this (tempting, I know), let's break this truffle-config.js down:
- mnemonic: it contains either a seed phrase (you know, those 12 or 24 words you should Never. Share. With. Anyone. Ever.) or your plain private key. DO NOT PUSH IT IN YOUR GIT REPO! They must stay secret lest someone steal all your tokens! To do that, put your mnemonic in your .env and gitignore it.
- rpc_url: that's the https url you got with Infura in the last step.
- networks: we define two networks, development and ropsten. The former is the one you use locally with Ganache. The latter, we'll use in the Gitlab CI. As you see, we use the RPC to interact with Ropsten and the mnemonic to use Ropsten from our Ethereum address.
The .gitlab-ci.yml file
To run any CI pipeline, you need a YAML file named .gitlab-ci.yml that lists the specifications of the whole pipeline: its various stages, the Docker image etc. For this tutorial we will only make one stage, test, that will run our Truffle tests.
image: node:latest

cache:
  paths:
  - node_modules/

stages:
  - test

test_async:
  stage: test
  services:
   - trufflesuite/ganache-cli
  script:
   - echo "MNEMONIC"=$MNEMONIC >> ".env"
   - export NODE_OPTIONS=--openssl-legacy-provider
   - npm install truffle
   - ./node_modules/truffle/build/cli.bundled.js compile
   - ./node_modules/truffle/build/cli.bundled.js migrate --network ropsten
   - ./node_modules/truffle/build/cli.bundled.js test --network ropsten
Here is the detail of the script's commands:
- echo "MNEMONIC"=$MNEMONIC >> ".env": states that the CI/CD Variable we will define in the next part corresponds to the .env variable in truffle-config.js
- export NODE_OPTIONS=--openssl-legacy-provider: this is to avoid a "error:0308010C:digital envelope routines::unsupported" error
- npm install truffle: installs truffle on the image to use the following commands
- ./node_modules/truffle/build/cli.bundled.js compile: compiles the smart contracts... duh!
- ./node_modules/truffle/build/cli.bundled.js migrate --network ropsten: migrates the smart contracts on Ropsten. The --network ropsten is very important as it states we are using the "ropsten" network defined in truffle-config.js
- ./node_modules/truffle/build/cli.bundled.js test --network ropsten: runs the tests with Truffle on Ropsten.
Set up Gitlab CI environement variables
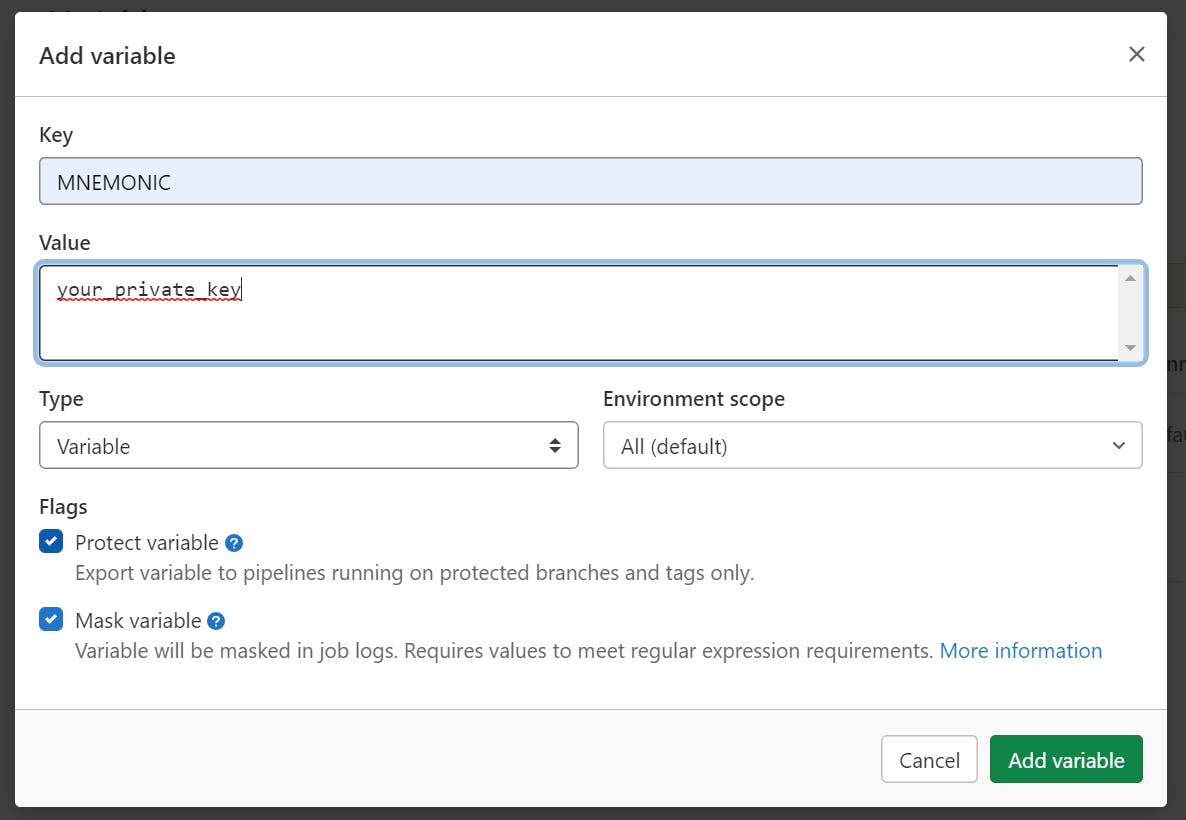
In your Gitlab repo, go to Settings > CI/CD > Variables, expand and click "Add Variable". Put MNEMONIC as key and your raw private key as value. You could also put the seed phrase but since Gitlab doesn't mask variables with spaces, it won't be masked. Important: If you select "protect variable", make sure the branch you are working on is protected !

Receive Ropsten ETH
Compiling your smart contracts on Ropsten is going to require some fake ETH. To learn how to get some, you can follow this tutorial.
Now, you're all set to run your pipeline by pushing in your branch or launching it manually! 🎉
If you are interested in learning more about Web3 dApps, check out my other tutorials!
If this tutorial was helpful, you can leave me a tip: 😊
ETH - benjaminazoulay.eth
BTC - bc1q2sf9deqxcyveslk6efrrxga7ch3n7wr97klfs6
BCH - bitcoincash:qqqm7g4cewyrk2gexklqshjactr3w6mkm5c6v6qtjr
